Ah, Scholar in *Final Fantasy XIV*—a class that’s often misunderstood. A healer that wields the power of both light and darkness (and sometimes feels like they’re wielding a sledgehammer with how complex the rotation can get). If you’ve ever tried to optimize your Scholar rotation, you know it’s more than just spamming spells and hoping for the best. But fear not, fellow adventurer! Whether you’re a seasoned scholar or a newcomer, this guide will break down the intricacies of the Scholar rotation in a way that won’t make your brain explode (hopefully).
The Scholar Dilemma: Healing with a Side of Headache
First off, let’s talk about what makes the Scholar rotation… well, challenging. Unlike other healers in FFXIV, Scholars have to juggle several mechanics: their powerful abilities, managing resources, and keeping track of their fairy (yes, *that* fairy). But perhaps the most frustrating part? The balance between using DPS spells for maximum efficiency and healing when things go south. You might find yourself asking, “Why do I feel like I’m healing *less* than other classes when I have more buttons to press?” It’s a legitimate question.
The Scholar rotation, especially in high-end content, can feel like you’re constantly walking a tightrope. You want to be healing, but you also need to deal some damage to keep your DPS up. The balance between the two is crucial, and *too much of either* can cause the whole group to flop like a chocobo on roller skates.
A Deep Dive into Scholar’s Core Abilities
To understand why Scholar rotations can feel so complex, let’s break down some of the core elements that you’ll be working with:
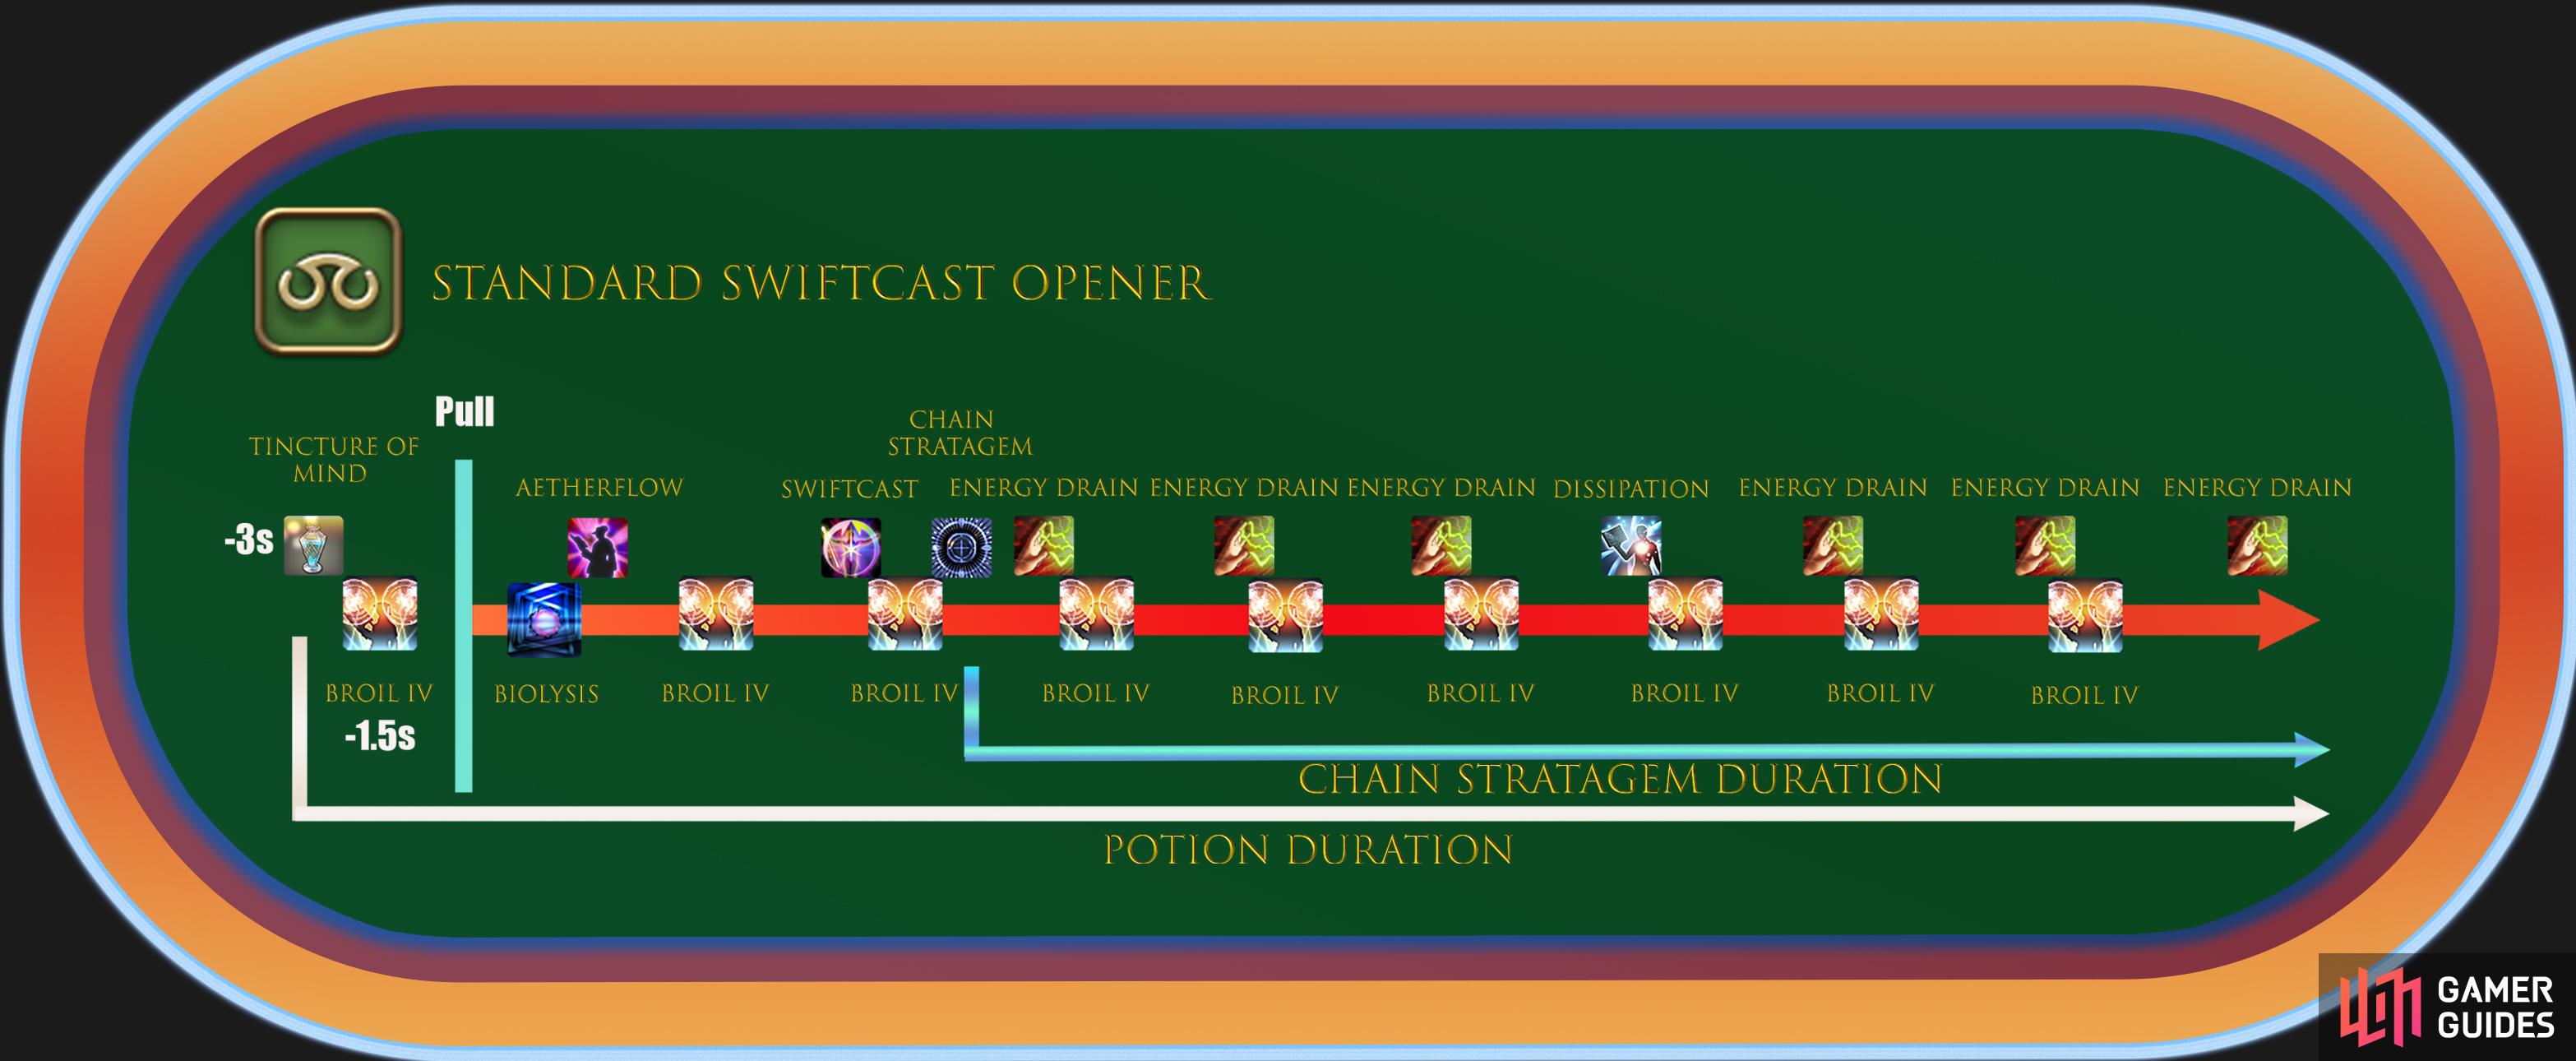
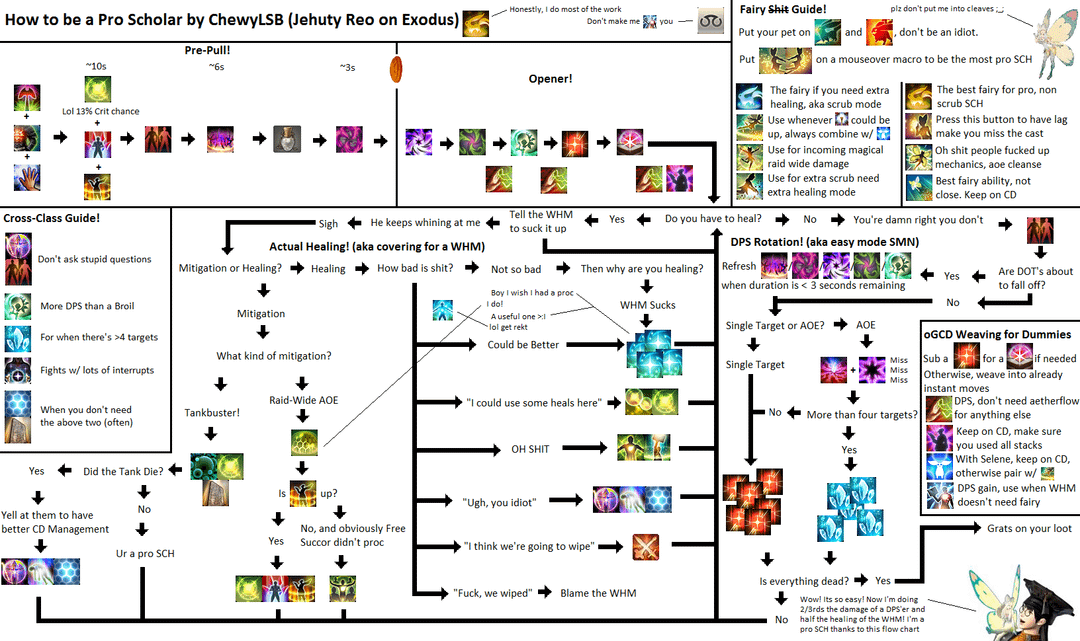
– **Aetherflow**: This is the bread and butter of a Scholar’s toolkit. It’s a resource system that powers many of your strongest abilities. Proper use of Aetherflow stacks is key to managing your healing and DPS output. Using them efficiently is the name of the game.
– **Summon: Eos or Selene**: You don’t just summon a fairy to follow you around like a cute pet. These fairies are your healers in disguise, with Eos focusing on healing and Selene providing utility. You’ll need to be mindful of their positioning and the type of fairy you’re using to make sure they complement your rotation.
– **DPS and Healing Spells**: Unlike other healers, you can’t just spam Cure and wait for things to work out. You need to balance damage-dealing spells like *Broil III* and *Adloquium* (your go-to shield spell). Mix in *Physick* when things get tough, and don’t forget *Sacred Soil* for group damage mitigation.
Common Mistakes: Why You’re Not Maximizing Your Scholar Rotation
It’s easy to get caught up in pressing buttons as fast as you can in FFXIV. However, there’s a difference between spamming abilities and using them *strategically*. Here are some common mistakes players make with their Scholar rotation:
1. **Not managing Aetherflow stacks properly**: Aetherflow is limited. If you burn through your stacks too quickly, you might find yourself with an empty tank at the wrong moment. Use them wisely, especially in moments of downtime or when the group needs more shielding.
2. **Ignoring DPS potential**: Healers, especially Scholars, need to deal damage too! If you’re constantly spamming heals, you’re likely leaving DPS on the table. It’s easy to get caught up in keeping everyone alive, but remember, the less time you spend healing, the more time you have for damage output.
3. **Fairy mismanagement**: If your fairy isn’t aligned with your needs (Eos for healing, Selene for utility), you’ll be working with one hand tied behind your back. Be sure to switch between them depending on the encounter, and make sure they’re in the right place to maximize their potential.
Community Feedback: “It’s Like Juggling, But with Magic”
What do other players have to say about the Scholar rotation? Well, it’s safe to say that opinions vary. Some players absolutely love the depth and the feeling of being able to weave damage and healing seamlessly together. Others, though, might find it a bit too much to handle, especially in faster-paced raids.
“I love Scholar, but my brain feels like it’s on fire sometimes when I’m trying to balance healing and damage,” one player writes on Reddit. “I can’t help but feel like I’m letting people die because I missed a button press in the middle of my DPS rotation.”
On the flip side, there are plenty of players who thrive on the complexity: “Scholar is the most satisfying healer when you get the rotation right. It’s all about timing. One perfect Aetherflow usage and you feel like a god.”
Solutions: A Practical Approach to Your Scholar Rotation
So how do you fix the issues with the Scholar rotation? Here’s what the experts (and a few well-meaning randoms in chat) suggest:
1. **Practice makes perfect**: This is key. Scholar rotations may seem intimidating at first, but with time and practice, you’ll begin to feel more comfortable with it. Try focusing on one aspect at a time: first get your Aetherflow usage down, then integrate your DPS abilities.
2. **Optimize your keybinds**: If your rotation feels sluggish, consider revisiting your keybindings. You want to make sure that your most frequently used abilities are easy to access and don’t require you to stretch your fingers into awkward positions.
3. **Review encounter mechanics**: Some encounters demand more healing, while others give you more room to DPS. Adapt your rotation to the needs of the fight—don’t just go through the motions.
4. **Communicate with your team**: Sometimes, it’s not just about your rotation. If you’re in a raid, make sure your team understands the flow of the encounter. Effective communication can help reduce the pressure on you as a healer, allowing you to focus on managing your abilities.
Your Turn: How Do You Manage Your Scholar Rotation?
Now, it’s your turn! Have you ever struggled with the Scholar rotation in FFXIV? Or maybe you’ve perfected it to the point where you’re the raid’s unsung hero? We’d love to hear about your experiences—what strategies do you use to stay on top of your game? Drop a comment below and share your tips, struggles, or even your greatest achievements as a Scholar!
Final Thoughts: Balance Is Key
In the end, Scholar is one of the most dynamic and rewarding healers in *FFXIV*, but it’s not for the faint of heart. It takes patience, practice, and a deep understanding of the game mechanics to really shine as a Scholar. If you’re up for the challenge, there’s a lot of satisfaction to be found in mastering the delicate dance between healing, DPS, and fairy management. Keep those Aetherflow stacks in check, manage your fairy properly, and you’ll be the MVP your party didn’t know they needed.
Happy healing, and may your Adloquiums always be perfectly timed!