
Baldur’s Gate 3 (BG3) has captivated gamers worldwide with its rich narrative, immersive world, and detailed character development. Among the various complex gameplay mechanics and intriguing items, one that stands out in both utility and lore is the Reflective Shell. But what exactly is this item, and how does it fit into the grand scheme of the game? This article aims to provide a comprehensive guide to the BG3 Reflective Shell, examining its purpose, mechanics, and impact on gameplay.

What is the BG3 Reflective Shell?
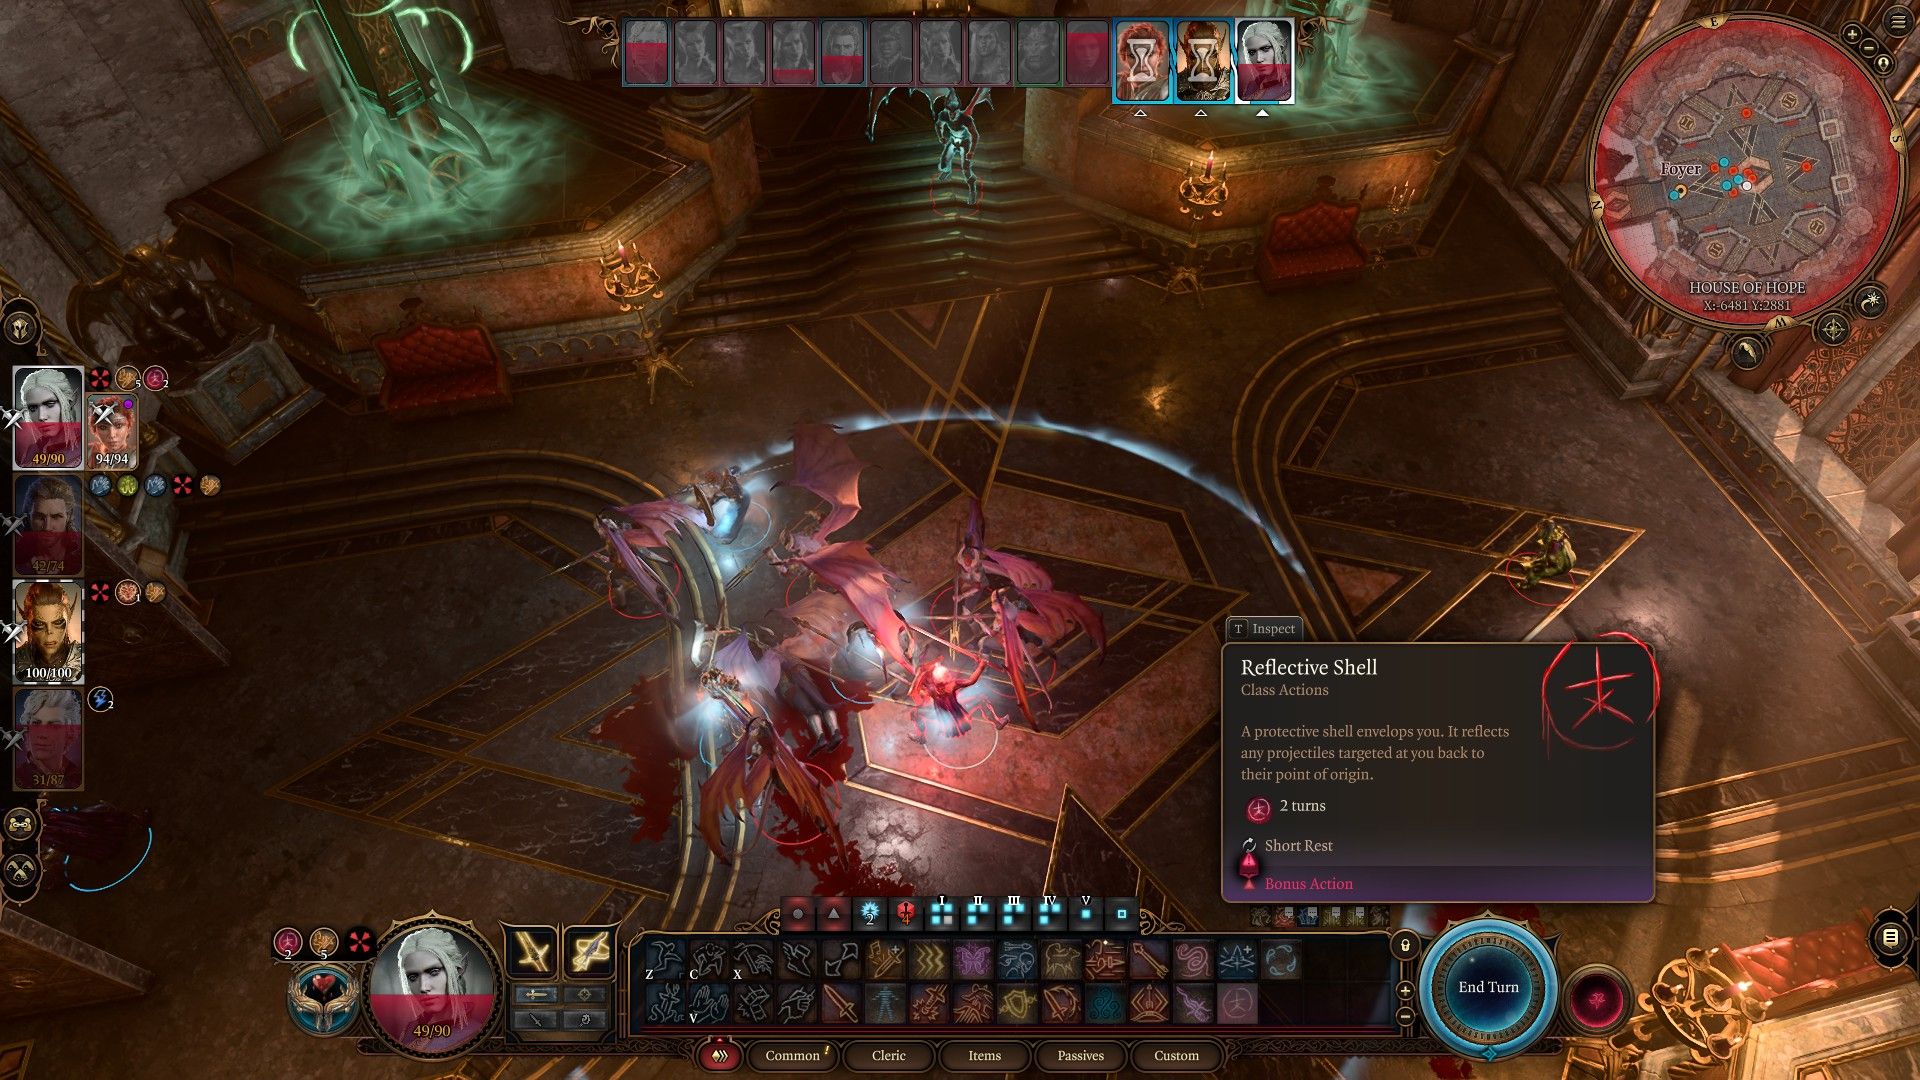
In Baldur’s Gate 3, the Reflective Shell is a magical item that plays a crucial role in both combat and strategy. It is a protective item that offers players a layer of defense through its unique reflective abilities. The shell can be equipped by specific characters and, when activated, creates a magical barrier that reflects a portion of incoming damage back at attackers.
For players, understanding how and when to use the Reflective Shell is key to maximizing its potential in combat situations. It is not just a defensive item; it’s a tool that, when used strategically, can turn the tide of battle by utilizing enemy aggression against them.
User Intent Behind the Keyword “BG3 Reflective Shell”
When users search for “BG3 Reflective Shell,” they are typically looking for more than just a description of the item. They are seeking practical advice on how to use it effectively, its benefits, possible drawbacks, and how it fits into their overall gameplay strategy. Players want to understand its mechanics—how it interacts with different characters, enemies, and combat situations.

Searches for this keyword often come from gamers who have already encountered this item in the game or are looking to optimize their playthrough by acquiring the shell. They may also be interested in comparisons with other items or abilities and how the Reflective Shell fares in different difficulty settings or with various party compositions.
Why is the Reflective Shell Important?
The Reflective Shell’s main strength lies in its ability to reflect a portion of damage back at enemies. This makes it particularly useful for tanks or frontline characters who are frequently the target of enemy attacks. In a game like BG3, where strategic positioning and careful planning are critical, the Reflective Shell can allow a player to counter enemy moves while keeping their own health intact.
This item also ties into the broader themes of the game, where players are encouraged to think creatively and make use of all available resources. The Reflective Shell emphasizes defensive play, allowing players to take less direct damage while also inflicting harm on their foes—a clever twist on traditional RPG item design.
When and How to Use the Reflective Shell in BG3
The Reflective Shell is most effective when used by characters who find themselves in the thick of combat. For instance, tank characters, who usually draw the attention of enemies, can equip the shell and position themselves in such a way as to maximize the damage dealt back to enemies. Timing is key, as activating the shell at the right moment can disrupt the flow of battle.
Additionally, players can use the Reflective Shell in combination with other defensive buffs or healing abilities to keep the wearer alive while still dealing significant damage. It’s also a strategic tool against enemies that rely heavily on physical attacks, as the shell reflects a portion of those incoming hits.
How the Reflective Shell Compares to Other Defensive Items
While there are numerous defensive items in BG3, the Reflective Shell stands out for its ability to turn defense into offense. Traditional armor or shields provide raw damage mitigation, but the Reflective Shell adds an extra layer of tactical depth. It encourages players to think about their positioning and timing, making it a unique and valuable asset for the right character.
In comparison to other defensive items, the Reflective Shell can offer a more dynamic approach to combat. Players who prefer a passive defense style might gravitate towards traditional armor, while those who enjoy active combat might favor the Reflective Shell for its potential to retaliate against foes.
Tips for Maximizing the Reflective Shell’s Effectiveness
1. Combine with High Health Characters: Characters with higher health pools can better withstand incoming damage while the Reflective Shell is active. This allows them to keep dealing damage back to enemies without being easily taken down.
2. Use with Crowd Control Spells: Spells that stun or immobilize enemies can be a great pairing with the Reflective Shell. When enemies are incapacitated, you have more room to position yourself and reflect their attacks more effectively.

3. Upgrade the Shell: If possible, upgrading the Reflective Shell can improve its durability and the amount of damage reflected. Always check for opportunities to enhance the item in your gameplay.
Conclusion
The BG3 Reflective Shell is more than just a magical item; it is a tactical advantage in the world of Baldur’s Gate 3. By reflecting damage back at enemies, it offers a unique way to turn the tide of battle in your favor. Understanding its mechanics and when to use it effectively is crucial for any player looking to optimize their playthrough. Whether you’re a tank, a spellcaster, or just someone looking to explore all the game has to offer, the Reflective Shell is an item that can make a big difference in your strategy and gameplay.
As with all items in BG3, the key to success lies in understanding their strengths and weaknesses, and how they can be used in harmony with your overall strategy. The Reflective Shell is no exception—it’s a tool that rewards careful planning and tactical execution, making it an indispensable part of any adventurer’s arsenal.


